
Connecting a Custom Domain
Connect your inblog-powered blog using a subdomain (e.g., blog.example.com), a root domain, or a subdirectory (e.g., example.com/blog), with guidance on DNS configuration.
Overview
The domain setup section may require developer assistance, particularly for DNS configuration or code implementation. Technical support sessions are available if needed.
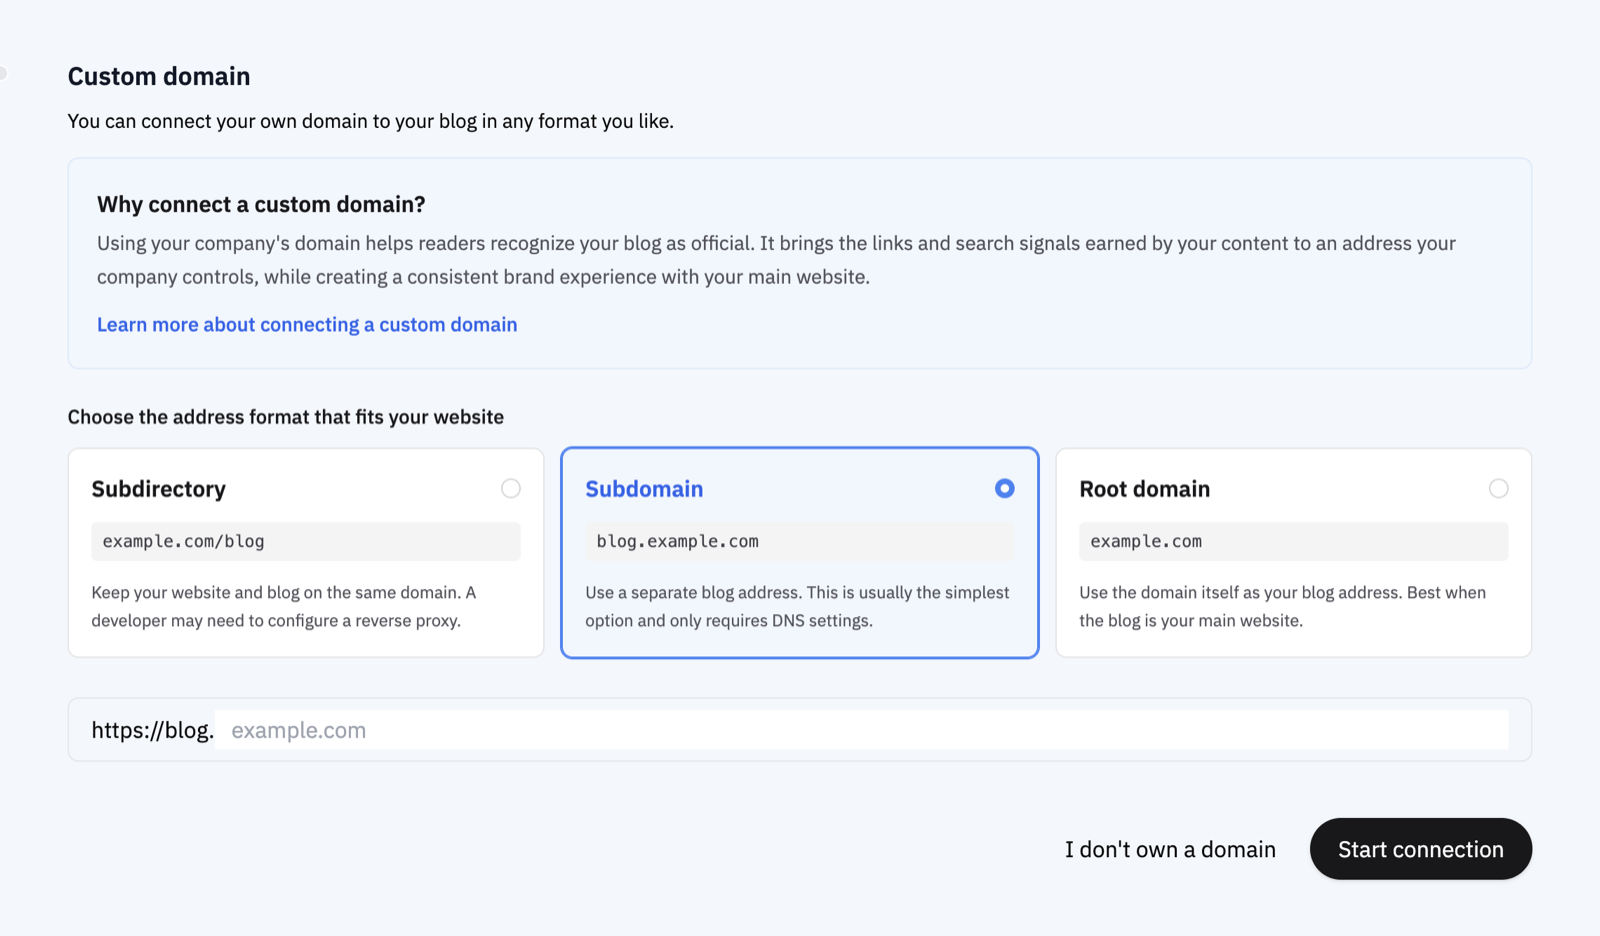
You can connect your inblog-powered blog using one of three approaches:
- Subdomain (e.g.,
blog.example.com) - Root domain (e.g.,
example.com) - Subdirectory (e.g.,
example.com/blog)
Where to add DNS records: DNS settings must be added where your domain is managed (e.g., Namecheap, GoDaddy, Cloudflare), not where your website is built (e.g., Webflow, Framer). If you built your site on Webflow but purchased your domain through GoDaddy, add the DNS records in GoDaddy.
Where to Find the Domain Settings
- Sign in at
inblog.ai/dashboard. You'll land on your list of blogs. - Click the blog card you want to set up. Domains are configured per blog, so if you run more than one, check that the right blog is selected.
- In the left menu, under the
Settingsgroup heading, clickDomain. (You don't open theSettingsscreen and look for it inside — clickDomaindirectly in the left menu.) - At the top of the Domain screen, pick the
Subdirectory,Subdomain, orRoot domaintab, enter your address, and clickStart connection. On the Subdirectory tab you then choose the web infrastructure you use, and the matching reverse-proxy guide appears step by step.
If the Domain screen is greyed out and won't take input, the blog is on the Free Plan. Custom domains are available on the Team Plan, including the 14-day free trial.
If clicking the card opens an initial setup screen instead of the management screen, follow the domain step there. See the initial setup section in Getting Started with inblog for details.
Subdomain Setup
In the Custom Domain settings, select Subdomain and enter your domain — without the subdomain part. The field is prefixed with a fixed https://blog., so entering example.com here always connects blog.example.com.
A blog uses one connection method at a time, so you can't run
blog.example.comandnews.example.comside by side.
Click Start connection to receive DNS configuration instructions. Add the records at your DNS provider exactly as shown. DNS changes can take up to 24 hours to propagate, and inblog checks the connection automatically.
If someone else manages your domain, use Copy request message below the DNS records and send the message to your developer or domain administrator. It includes the address and every record they need to add.
If your DNS provider rejects the CNAME value: some providers (e.g., Gabia) require the value to be a fully qualified domain name and show an error such as "the value must end with a dot (
.)". In that case, add a trailing dot to the exact value inblog gave you. For example, if inblog showsabc123.vercel-dns-016.com, enterabc123.vercel-dns-016.com.. Other providers (e.g., Imweb) expect the value without the trailing dot. Follow the format your provider asks for.
Can I Also Connect www, or Add a Second Domain?
No. A blog holds exactly one custom domain. For subdomain and root domain connections, inblog issues an SSL certificate only for the address you registered. It can't receive and redirect requests for an address that isn't registered, and there is no separate alias field for www either.
If you need www.example.com → example.com (for example, because Google already treats the www version as canonical):
-
Pointing
wwwat inblog with a CNAME alone produces a certificate error such asERR_CERT_COMMON_NAME_INVALID—wwwis a separate hostname, and no certificate exists for it. -
Leave only your canonical address registered in inblog, and point
wwwat the redirect service of whoever manages your domain or hosting (Cloudflare, Vercel, your web server). Issue awwwcertificate there, then add a permanent redirect as below. We recommend 308 for new rules; keep a correctly working 301, or use 301 if your provider only supports it. See 308 vs 301 and when to use each:https://www.example.com/* → https://example.com/* -
Preserve the path and query string in the rule. The reverse direction (
example.com→www.example.com) works the same way.
If you want to run two addresses at once (for example, keep blog.example.com and add example.com/guide):
- Create a second blog and connect the second address to it.
- Both subscriptions and domain connections are per blog in inblog, so one Team Plan subscription can't cover two blogs. The new blog needs its own subscription — see the FAQ.
- If a page already exists at the path you want to add (say
example.com/guidecurrently opens something else), connecting it as a subdirectory replaces that path with inblog. Move the existing page elsewhere, or pick a path that is free.
Subdirectory (Sub-folder) Setup
The dashboard currently provides setup guides for Next.js, Vercel, AWS Amplify, AWS CloudFront, Cloudflare, Nginx, Webflow, and Framer. Choose Other / Contact us if your infrastructure is not listed.
Supported platforms include:
- Next.js: Supported, except for static export
- Vercel / AWS Amplify: Supported as hosting platforms
- Cloudflare: Supported when you can manage the hostname's Zone, Worker, and Routes in your own Cloudflare account, and the existing website works while its DNS record is
Proxied. Seeing Cloudflare in response headers or an IP lookup alone does not meet this requirement. - Framer / Webflow: Supported via reverse proxy using Cloudflare
Before using the Cloudflare guide: continue only when the existing website already works while
Proxied, and the target path (for example,/blog) is unused or its existing content and URLs have been migrated. ADNS onlyrecord, a SaaS website builder, another CDN or proxy, or an account that cannot manage the Cloudflare Zone and Worker Routes requires a separate review. If the hostname cannot remain proxied, use a subdomain connection instead.
The dashboard's connection guide also provides step-by-step setup for AWS CloudFront and Nginx.
If your environment isn't in that list (Apache, for example), choose Other / Contact us. Any web server that can proxy a specific path to an external origin can be connected through a custom reverse proxy — reach out over chat and we'll confirm feasibility with you.
Select Subdirectory in the Custom Domain settings and enter your domain (e.g., example.com/blog). Click Start connection for the full setup guide. Note that subdirectory setup typically requires code implementation.
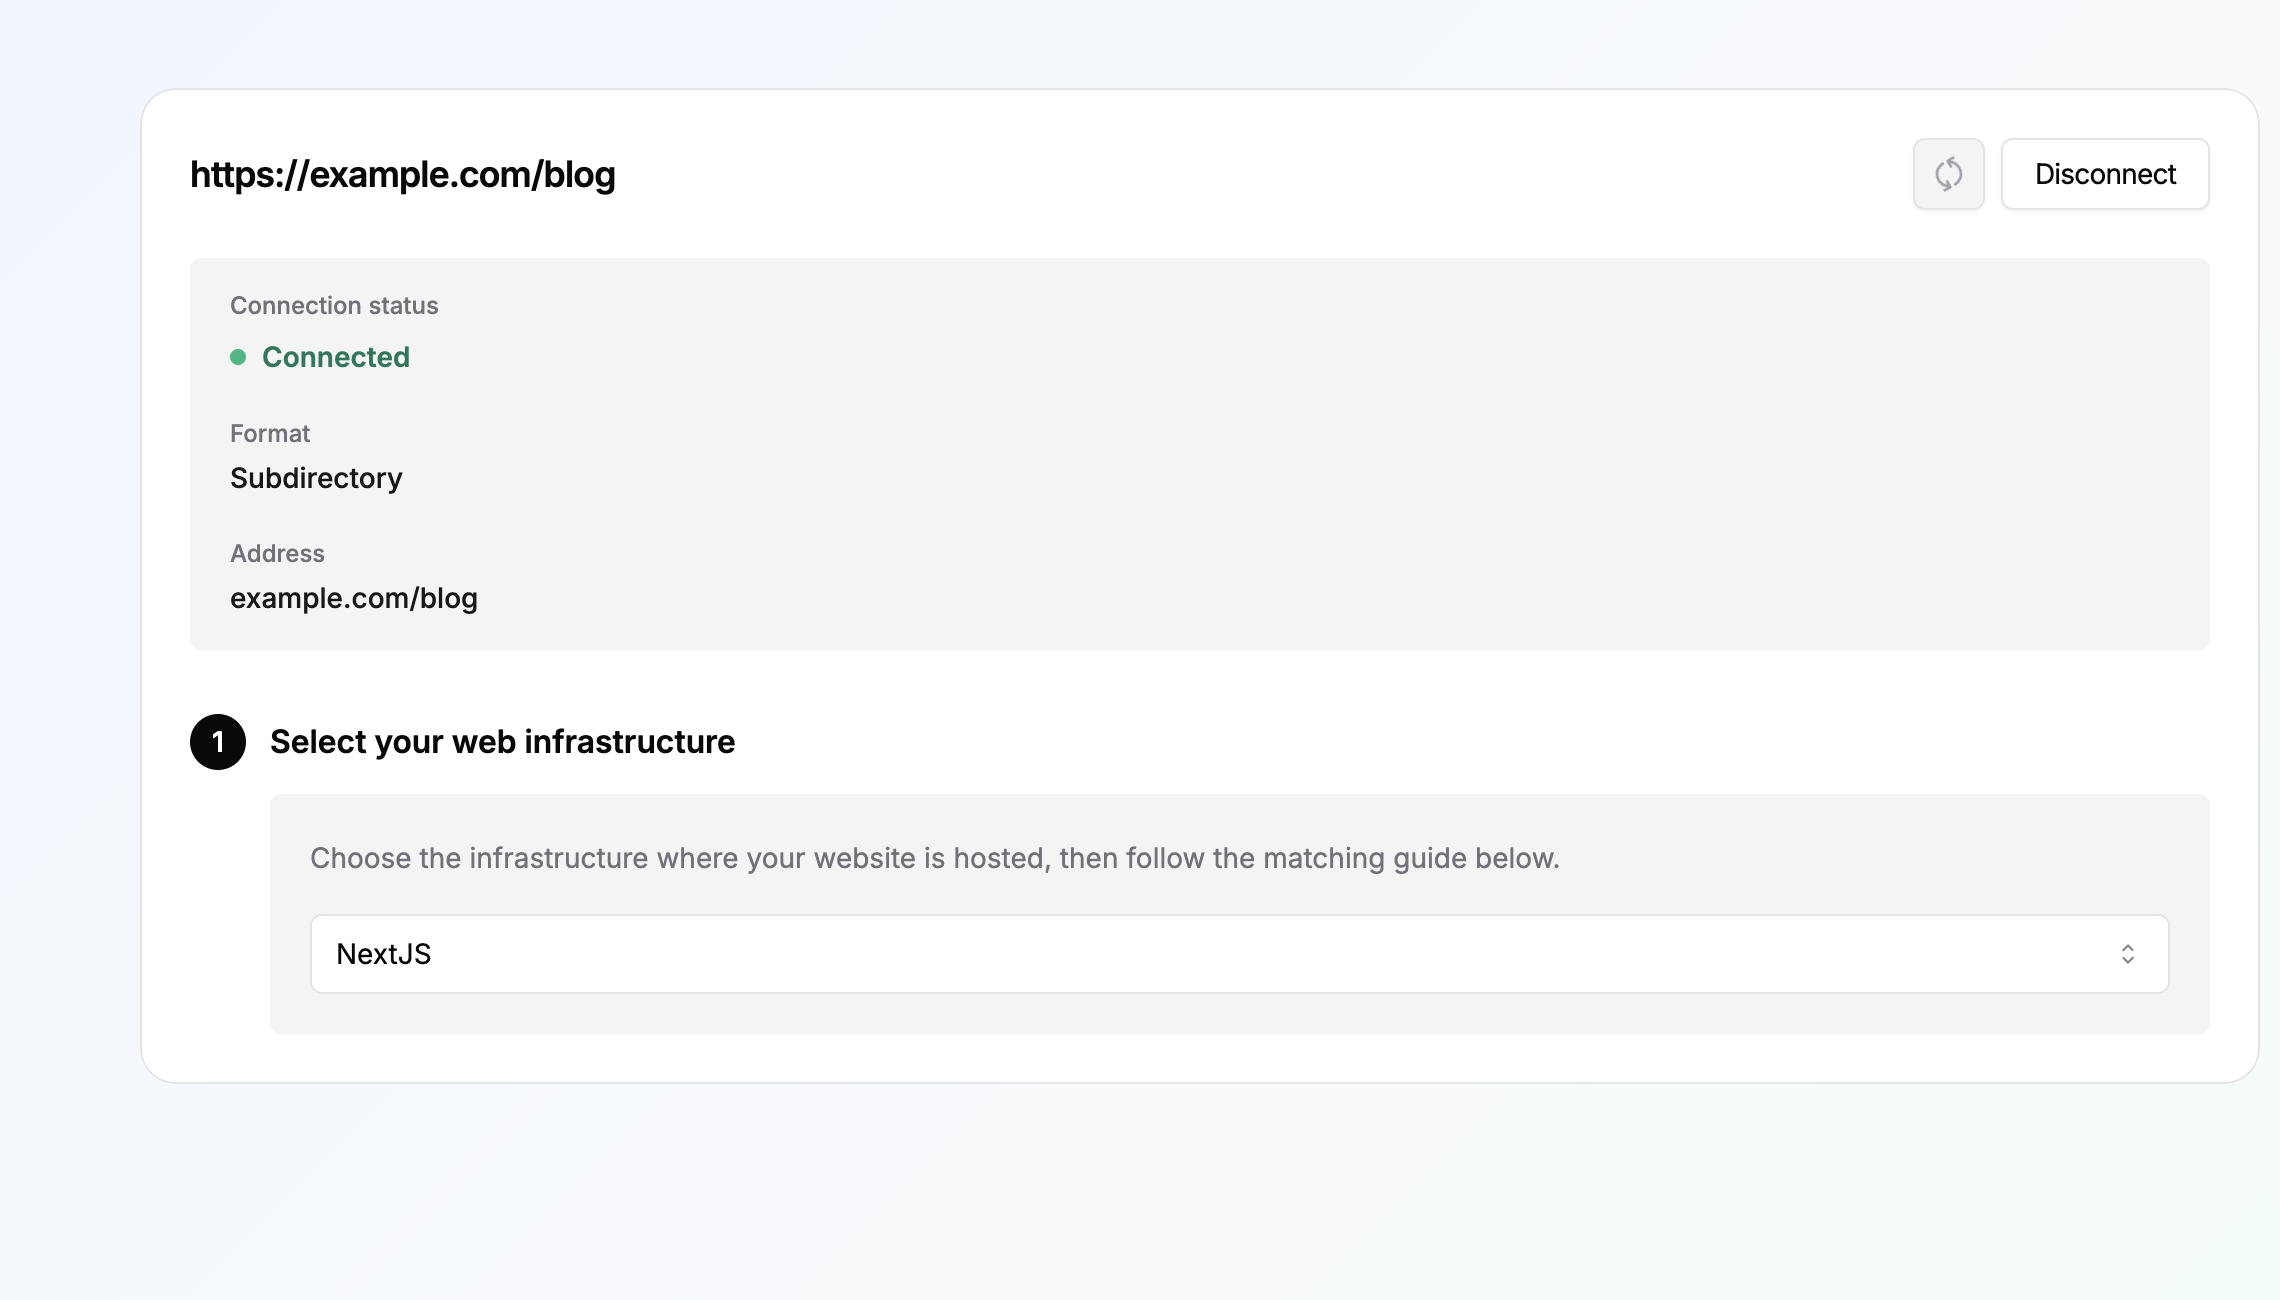
The "web infrastructure" picker doesn't change anything on inblog's side. It only decides which setup guide you see, so switching it later has no effect on a domain you've already connected.
If a CDN or proxy such as Cloudflare or CloudFront already sits in front of your web server (Apache, Nginx, and so on), pick that CDN regardless of the origin server. Handling the proxy rule where requests arrive first is simpler and leaves your origin configuration untouched.
My domain registrar isn't in the "web infrastructure" list
That's expected. The list asks where your website is currently served from, not where you bought the domain. The screen says: "Choose the infrastructure where your website is hosted, then follow the matching guide below." It only lists environments inblog ships a proxy guide for, so registrars and DNS providers such as Namecheap or GoDaddy aren't options here.
If your provider sells both domains and web hosting (Gabia, Cafe24, and similar), go by the web server your site actually runs on — usually Apache or Nginx — rather than the provider's name. Nginx means
Nginx; Apache, or anything you can't confirm, meansOther / Contact us.
The list contains: NextJS, Vercel, AWS Amplify, AWS CloudFront, Cloudflare, Nginx, Webflow, Framer, and Other / Contact us. (A Korean-language dashboard also shows Cafe24 and Imweb; selecting either reports that subdirectory connection isn't available for that environment.)
How to decide:
- If a CDN or proxy such as Cloudflare or AWS CloudFront sits in front of your site, pick that CDN regardless of the origin server.
- Otherwise, pick the server or platform that actually serves the site (
Nginx,Vercel,NextJS,Framer, and so on). - If the site was built with something that isn't listed (WordPress, PHP), go by the server it runs on, not the tool it was built with. WordPress on Nginx is
Nginx; WordPress on Apache isn't listed, so chooseOther / Contact us. - If you can't tell, choose
Other / Contact us— it opens a chat with us and we'll confirm feasibility together.
If an agency built your site, ask them two things
- Which web server or hosting serves the site today (Nginx, Apache, Vercel, and so on), and whether a CDN such as Cloudflare or CloudFront sits in front of it.
- Whether they can add a reverse proxy (rewrite) rule for
/blogand/blog/*only. It must be a rewrite, not a redirect.
Do I need to pick web infrastructure for a subdomain?
No. The web infrastructure picker only appears for subdirectory connections.
Subdomain (blog.example.com) and root domain (example.com) connections never touch your existing website's server — you only add DNS records — so the screen doesn't appear at all. If you're seeing the infrastructure list, you're currently going through the subdirectory flow.
If you can't add a proxy rule on your website's server, switching to a subdomain connection in the Domain tab is usually the faster path: it only needs DNS records at whoever manages your domain.
AWS CloudFront Subdirectory Setup
To configure inblog in a sub-directory using AWS CloudFront, check the following setup steps.
- Use the distribution that serves your main website, or create a new distribution if CloudFront is not configured yet.
- Set Distribution name to
inblog proxyand Domain toexample.com. - Set Origin type to
Other, Custom origin toproxy.inblog.dev, and Origin path to/{subdomain}. - Set the origin request policy to
Managed-AllViewerExceptHostHeaderso CloudFront does not forward the viewerHostheader toproxy.inblog.dev. - Create a CloudFront Function for URI rewriting and paste the following code.
function handler(event) {
  var request = event.request;
  var uri = request.uri;
  var basePath = "/blog";

  var host = request.headers.host && request.headers.host.value;
  if (host) {
    request.headers["x-inblog-public-host"] = { value: host };
    request.headers["x-forwarded-host"] = { value: host };
  }
  request.headers["x-forwarded-prefix"] = { value: basePath };

  if (basePath === "/") {
    return request;
  }

  if (uri === basePath) {
    request.uri = "/";
    return request;
  }

  if (uri === basePath + "/") {
    request.uri = "/";
    return request;
  }

  if (uri.startsWith(basePath + "/")) {
    request.uri = uri.substring(basePath.length);
    return request;
  }

  return request;
}
- Add behaviors for
/blog,/blog/*, and/robots.txt. - Publish the function to
Live, then attach it to theViewer requestevent for all three behaviors.
After deployment, verify the following URLs from your terminal.
curl -I https://example.com/blog
curl -I https://example.com/robots.txt
CloudFront Returns a 502 Error
First, make sure you did not leave Origin path empty. A subdirectory connection uses Custom origin proxy.inblog.dev together with Origin path /{subdomain} — not a separate CNAME value.
If your settings match that and 502 errors persist, check the following in order. One of these is missing in most cases.
- All three behaviors —
/blog,/blog/*, and/robots.txt— use theproxy.inblog.devorigin. - All three behaviors use the
Managed-AllViewerExceptHostHeaderorigin request policy. If the viewerHostheader is forwarded, the origin cannot serve the request. - The CloudFront Function is published to
Live— saving it is not enough. - That function is attached to the
Viewer requestevent on all three behaviors. - The distribution has finished deploying (Deployed), including your most recent change.
If everything above checks out and the 502 continues, send us the output of the three commands below. Comparing a request through CloudFront against a request straight to the origin lets us isolate the cause.
curl -I https://example.com/blog
curl -I https://example.com/robots.txt
curl -I https://proxy.inblog.dev/{subdomain}
Apache Subdirectory Setup
Apache is not in the dashboard's infrastructure list, so pick Other / Contact us and add the reverse proxy rules to Apache yourself. Replace example.com, /blog, and {subdomain} with your own values.
First, confirm which server the rules belong on. The company you bought the domain from (registrar/nameservers) is often not the machine that actually serves your site. If your nameservers sit with a hosting provider while the website itself runs on Apache on an AWS EC2 instance, the proxy rules go into that EC2 instance's Apache configuration, not the hosting provider's DNS screen.
Add the following to the VirtualHost that serves your site (the port 443 VirtualHost if you use HTTPS).
SSLProxyEngine On
ProxyPreserveHost Off

<Location "/blog">
  RequestHeader set X-Inblog-Public-Host "expr=%{HTTP_HOST}"
  RequestHeader set X-Forwarded-Host "expr=%{HTTP_HOST}"
  RequestHeader set X-Forwarded-Prefix "/blog"
</Location>

ProxyPass "/blog" "https://proxy.inblog.dev/{subdomain}"
ProxyPassReverse "/blog" "https://proxy.inblog.dev/{subdomain}"

ProxyPass "/robots.txt" "https://proxy.inblog.dev/{subdomain}/robots.txt"
ProxyPassReverse "/robots.txt" "https://proxy.inblog.dev/{subdomain}/robots.txt"
ProxyPass "/blog"also forwards everything below/blog, so you do not need a separate rule for individual post URLs.- The two
RequestHeaderlines inside<Location "/blog">tell inblog the address visitors actually browse (example.com) and the sub-directory it is served under (/blog). The proxy strips both, and analytics needs them to attribute post URLs correctly. Routing never reads them, so the blog keeps working if you leave them out (they requiremod_headers). Keep them inside the<Location>block: at VirtualHost scope they would be attached to every request on your own site and could change how your application builds its URLs. ProxyPreserveHost Offis the critical line. If the visitor'sHostheader is forwarded as-is, inblog cannot serve the request. It plays the same role as CloudFront'sManaged-AllViewerExceptHostHeaderpolicy and Nginx'sproxy_set_header Host proxy.inblog.dev.- Skip the
/robots.txtrules if you already run your own robots.txt. See Will Subdirectory Setup Overwrite My Existing robots.txt? below.
Enable the required modules, test the configuration, and reload.
Ubuntu / Debian
sudo a2enmod proxy proxy_http ssl headers
sudo apachectl configtest
sudo systemctl reload apache2
Amazon Linux / CentOS / RHEL (the modules are often enabled already)
sudo apachectl configtest
sudo systemctl reload httpd
Once both URLs below return 200, the status on the inblog Domain screen switches to Connected on its own.
curl -I https://example.com/blog
curl -I https://example.com/robots.txt
If you do not have permission (sudo) to edit the VirtualHost file, ask whoever operates the server to apply the configuration above.
My Subdirectory Blog Returns ERR_TOO_MANY_REDIRECTS
The blog path is stuck in a redirect loop and won't load at all. The cause is usually a /blog rule on your own site. These two are the most common.
1. It must be a rewrite, not a redirect
Passing /blog to inblog requires a rewrite (reverse proxy) — the address stays the same and your server answers with inblog's response. A redirect makes the /blog request point back at /blog, which loops forever.
/blog       →  https://proxy.inblog.dev/{subdomain}
/blog/:path*  →  https://proxy.inblog.dev/{subdomain}/:path*
2. The www form differs between inblog and your site's canonical address
If your site treats example.com (non-www) as canonical but the address registered on inblog is www.example.com/blog, the www and non-www redirects bounce off each other. Settle on one form.
- Register the address on the inblog Domain tab in the same form your site uses as canonical.
- Apply
www→ non-www consolidation in your host's domain redirect settings, in one direction only — not as a/blog-specific rule.
How to tell which side is at fault
Compare the response headers for each address. If the last command returns 200, it is usually your site's redirect rules that need fixing — see the caveat just below for the exception. If it returns a 3xx instead, the inblog side needs checking — send us that output over chat.
curl -I https://example.com/blog
curl -I https://www.example.com/blog
curl -I https://proxy.inblog.dev/{subdomain}
If the rule is already a
rewriteandproxy.inblog.devanswers200but the loop persists, check thelocationheader on the first command's response. When it sends you back to the address you just requested, no further change on your side will fix it. Stop editing the rules and send us that full response header over chat.
A Domain connection check warning on the domain card can have the same cause. It also appears for firewall blocks or transient failures, and clears itself on the next check once the proxy rules are working. See What the connection check warning means for the message-by-message breakdown.
My Blog Worked Yesterday and Now Returns 404
Nothing changed in inblog, but all of example.com/blog returns 404. The most common cause is that a redeploy, CDN change, or firewall change on your site dropped or overwrote the /blog proxy rule.
First: don't disconnect the domain in inblog. Removing and re-adding the connection won't restore your site's proxy rule — it only forces you through domain verification again.
1. Identify which 404 page you're seeing
The look of the 404 page tells you how far the request travelled.
| What you see | Distinguishing details | What it means |
|---|---|---|
| Your own site's 404 | No inblog elements at all — your existing website's error page | The request never reached inblog. Check that your site's /blog proxy rule still exists. |
| The inblog marketing site's 404 | A large 404 figure with the inblog top navigation (Showcases, Pricing, Get started), a Back to home button, and Docs / Sitemap / llms.txt links | Requests are being forwarded to the inblog marketing site (inblog.ai) rather than to your blog. Confirm your proxy rule targets https://proxy.inblog.dev/{subdomain}. |
A bare This page could not be found. | A white page with that single English line — no navigation, buttons, or links | The request reached proxy.inblog.dev, but no blog or post was found there. Check that the blog address ({subdomain}) at the end of the rule isn't missing or wrong. If it only happens on one post, check whether that post was unpublished, deleted, or had its slug changed. |
2. Isolate the broken side with a request
curl -I https://example.com/blog
curl -I https://proxy.inblog.dev/{subdomain}
If the second command returns 200, inblog is fine and you only need to restore the /blog rule on your site. If the second command also fails, send us that output over chat.
3. Retrace what changed recently
- A site redeploy — if the proxy config isn't part of your build output, every deploy wipes the rule.
- CDN or WAF rule changes, or a newly added bot-protection policy.
- Web server config replacement, certificate renewal, or similar server work.
4. Check the dashboard warning too
If Settings → Domain shows a warning, the section below explains what each message means.
What Does the 'Connection Check Warning' on the Domain Card Mean?
inblog periodically checks whether your connected domain actually serves this blog, and shows a Domain connection check warning under Settings → Domain when it doesn't get the expected response.
The warning alone doesn't block visitors from reaching your blog, and it clears automatically once a later check succeeds. Each message points somewhere different.
| Message shown | What it means and what to do |
|---|---|
| We couldn't finish the connection check on our side / We couldn't confirm the latest connection check | The check didn't complete on our end. Nothing to do — we check again automatically. |
| DNS looks correct. We're waiting for the HTTPS certificate… | DNS is set correctly. It usually takes a few minutes, so just wait. |
| Your DNS records don't match what inblog expects | Compare the values shown in domain settings against the records at your DNS provider. |
| Domain ownership still needs to be confirmed… | Add the TXT record shown in domain settings. |
| This domain is already connected to another blog | Contact us over chat and we'll move it. |
| (address) is serving another blog instead of this one | Your proxy rule points at the wrong blog in proxy.inblog.dev/{subdomain}. Correct the blog in the rule. |
| (address) responded, but the page it returned isn't served by this blog | Your proxy rule is forwarding requests somewhere other than inblog. Check the rule's target. |
| (address) returned HTTP (code) | Your site is responding with that status code. Clears automatically once it responds normally again. |
| We couldn't reach (address) | We couldn't connect to your site. Clears automatically once your site recovers. |
| (address) answered our check with HTTP 403 | A firewall or bot protection may be filtering our check request. Allow it through. |
Will Subdirectory Setup Overwrite My Existing robots.txt?
The setup guide includes a rule that proxies /robots.txt to inblog alongside your blog paths (/blog, /blog/*). That rule exists for sites that don't already have a robots.txt. If you already maintain your own, don't apply it as-is.
A domain has only one robots.txt, served from the root and applied to every path beneath it. Proxying /robots.txt means inblog's file answers instead of yours, so any Disallow rules you had stop applying.
If you already have a robots.txt, pick one of these:
1. Drop just the /robots.txt rule (recommended)
- Keep the proxy rules for your blog paths (
/blog,/blog/*) and remove only the/robots.txtrule. - Add your blog's sitemap to your existing robots.txt:
Sitemap: https://example.com/blog/sitemap.xml
- Confirm none of your existing
Disallowrules block the blog path (/blog).
2. Keep the proxy and edit robots.txt inside inblog
- Go to Settings → SEO Tools → Robots.txt in the dashboard (paid plan, after your custom domain is connected).
- Paste your existing rules there and keep the blog sitemap line. Whatever you save is served as the response for
example.com/robots.txt. - The editor comes pre-filled with the default inblog generates (allow all crawlers, plus sitemap URLs). Clear it completely and save to go back to that default.
You don't need to maintain the sitemap yourself. With the proxy in place,
example.com/blog/sitemap.xmlis regenerated by inblog whenever you publish or edit a post. There's no xml file to upload or refresh on your side.
Subdirectory and Google Search Console
When you connect a subdirectory (e.g., example.com/blog), your blog traffic is included under the existing root domain Search Console property. If you want to analyze blog-only data separately, you can add an additional URL-prefix property:
- Property type: URL prefix
- URL:
https://example.com/blog
This separate property also requires its own HTML tag verification. Add the meta tag for this property in the inblog dashboard under Design tab → Advanced settings (Code injection).
"Start connection" does nothing, or an error popup blocks the next step
This is the step before DNS records — the connection itself won't start.
If the request is rejected, the Domain screen shows an error near the address field or in a popup. Check the causes below before trying again.
Check the following in order.
- Confirm you're on a paid plan. Connecting a custom domain is a paid-plan feature, so connection requests are rejected on the free plan.
- Confirm your account is allowed to connect domains. Only an owner, admin, or editor of that blog — with the invitation already accepted — can connect or disconnect a domain.
- Don't connect and disconnect repeatedly in a short window. Domain connect/disconnect requests are limited to 10 per hour. Past that limit, every further attempt is rejected and never advances. Nothing is misconfigured — just wait about an hour and try once more.
- Check the input format. The Subdomain tab already prefixes the field with
https://blog., so enter onlyexample.com— withouthttps://orwww. The Subdirectory tab expects the full path, likewww.example.com/blog. - (Subdirectory) Confirm the domain you entered already resolves on the internet. Before starting the connection, inblog looks up the domain part of
www.example.com/blog(www.example.com) in public DNS. If that exact host has no public A, AAAA, or CNAME record, the lookup fails and the request is rejected. (If you typedwww, the record has to exist on thewwwhost.)
A subdirectory connection layers your blog onto a site that is already live. This step only checks that the DNS record exists, but the steps after it require you to add a reverse-proxy rule on that site. Add the DNS record pointing to your existing site first, confirm that
https://www.example.comopens normally, and then start the connection. On Cloudflare, that record must beProxied.If this is a new domain with no site behind it yet, a subdirectory connection isn't the right fit — there's no site to put a proxy rule on. Use a subdomain such as
blog.example.cominstead; subdomain and root-domain connections work by adding the DNS records inblog gives you, so no existing site is required.
What does (not verified) mean in the blog list?
After adding DNS records, the domain status in the inblog dashboard's blog list may show (not verified). This means inblog has not yet confirmed your DNS records. Common reasons:
- The DNS records haven't been added yet, or the values are incorrect.
- DNS propagation takes up to 24–48 hours after changes are made.
Once the status changes to (verified), DNS confirmation is complete. The domain may take a few more minutes to become fully accessible.
The Domain tab says "Issuing SSL certificate". Should I just wait?
In most cases, yes. Unless you have set a CAA record on the domain, there is nothing left for you to do. "Issuing SSL certificate" appears only after your DNS records have been confirmed, when the HTTPS setup is the last remaining step. It means your records already passed validation.
For subdomain and root-domain connections, the Domain tab shows one of four connection states:
| Status | Meaning | What to do |
|---|---|---|
DNS record setup required | The records we listed aren't visible yet | Add them at your DNS provider |
Checking DNS record setup | inblog is looking up your records right now | Wait a moment |
Issuing SSL certificate | Records confirmed, HTTPS being prepared | Wait |
Connected | Connection complete | — |
Subdirectory connections show a different set of three states instead:
Reverse proxy setup required,Checking reverse proxy connection, andConnected.
DNS changes can take up to 24–48 hours to propagate, and the site may take a few more minutes to open after the certificate is issued.
- If you have set a CAA record on the domain, check it as well — it can block certificate issuance.
- If it stays on "Issuing SSL certificate" for more than a day, send us the address you're connecting along with a screenshot.
The domain card says "Could not find nameservers for this domain."
inblog looks up the nameservers of the root domain behind the address you entered (e.g., blog.example.com → example.com) so it can tell you which DNS service to add records to. This warning means that lookup returned nothing. Check the following:
- The domain is spelled correctly.
- The domain is actually registered and has not expired.
- Nameservers are assigned at your domain registrar (they can be empty right after purchase).
This warning only reflects the lookup we use to tell you which DNS service to use — it does not block verification. If the domain genuinely has no nameservers assigned, records you add won't resolve either, so finish the nameserver setup at your registrar first. If the connection proceeds normally after you add the records, you can ignore this warning.
It works for me, but others can't open my blog
Sometimes the domain status shows "Verified" and the blog loads fine for you, but people you share the link with can't reach it. This usually isn't a domain configuration problem — the network they're on (home Wi-Fi, mobile carrier, office network) still has the old state in its DNS cache. DNS changes roll out at different speeds on different networks for up to 24–48 hours, so public DNS can already be correct while some networks still fail to resolve the address.
What to do:
- Share the full address (e.g.,
https://blog.example.com) rather than a partial one. - Ask anyone who can't reach it to try mobile data instead of Wi-Fi, or to retry a little later.
- If it still fails on a specific network after 24–48 hours, send us the exact address used and a screenshot of the error from that environment.
Can I Move a Subdomain Blog to a Subdirectory?
Yes. Switch the connection type to Subdirectory on the Domain tab and register the new address (e.g., example.com/blog). Note that a blog uses one connection type at a time, so blog.example.com and example.com/blog can't run side by side.
What follows automatically
- Post slugs don't change. Only the host and leading path differ, so there's no per-post work.
- Canonical URLs, the sitemap, RSS, and category/author page addresses switch to the new address once the new connection is verified (caches may take a few minutes to catch up).
- API and CLI automations (Make, Zapier, n8n, and so on) are unaffected. An API key is tied to the blog itself rather than to the custom domain, so changing the connection type doesn't break it.
What you need to handle yourself
- Set up a permanent redirect (308 recommended) from your old custom subdomain (
blog.example.com) yourself. Once it's disconnected, inblog no longer answers on that host, so add ablog.example.com/{slug}→example.com/blog/{slug}rule wherever you manage the domain or hosting. Since slugs are unchanged, a single rule that swaps the host and prefixes/blogis enough. - Point
blog.example.com's DNS record away from inblog first, or the redirect rule won't take effect — with the old CNAME still in place, requests keep heading to inblog. - The default inblog domain (
xxx.inblog.io) and your old custom domain have separate redirect behavior. For subdomain and root-domain connections, the default domain redirects automatically when the domain is verified and the blog has an eligible Team-or-above plan or active trial. For subdirectory connections, default-domain redirects depend on the proxy setup: a proxy that uses the default domain as its origin can loop if that address redirects back. Contact us via chat to check your setup before relying on this redirect. The canonical URL separately signals the subdirectory address as the preferred URL. Your team must still configure redirects from the old custom domain.
Will the blog go down during the switch?
After verifying the new proxy setup, check that the blog loads at the new subdirectory address. Also check the default-domain redirect behavior and the old custom-domain redirect rules separately. Your existing website isn't touched beyond adding the /blog path rule.
Search engines need time to re-index a changed address. Set up a permanent redirect from each old address to its matching new page. We recommend 308 for new rules, but you do not need to change an existing, correctly working 301. Redirects signal the new address; they do not guarantee indexing, rankings, or traffic.
After a Domain Change, Do Links and CTA Buttons Inside My Posts Update Too?
No — addresses written into a post stay as they are. Canonical URLs, the sitemap, RSS, and category/author pages regenerate against the new domain, but these two are stored on the post itself and don't follow along:
- Absolute addresses in the body (links, images, or buttons pointing at
https://old-domain/...) - The URL on each post's bottom CTA button
- A canonical URL you typed into the post yourself. A per-post canonical takes priority over the generated one, so it keeps pointing at the old domain.
Bottom CTAs can be changed in bulk. In Posts manager, select the posts and click Edit to open the bulk-edit dialog, then turn on CTA Settings and enter the new address under CTA Link to apply it to everything you selected at once.
- Bulk editing overwrites the selected posts with the same value. There's no find-and-replace that swaps "old domain → new domain" per post, so if the links differ, group posts that share an address and apply them in batches.
- Body links aren't covered by bulk editing. Open the post and edit them there.
- A permanent redirect on the old address sends visitors to the new one, but the links stored in your posts still point at the old domain.
When each post has a different CTA link and you only want to swap the domain
If you have hundreds of posts whose CTA links all differ, so bulk editing's "same value everywhere" can't do the job, you can swap just the domain through the Posts API. There's no need to wait for a dedicated feature.
-
In the left menu under
Settings→API Keys, issue an API key that includes theposts:readandposts:writescopes. -
Call
GET /api/v1/postspage by page withpage[number]andpage[size]to read each post'scta_link. -
Keep only the posts whose value contains the old domain.
-
Leave the path, query, and hash untouched and replace only the domain with the new one.
-
For each post, send
PATCH /api/v1/posts/{POST_ID}with just thecta_linkfield. The request body looks like this:{ "data": { "type": "posts", "attributes": { "cta_link": "https://new-domain/path" } } } -
Read the posts back and confirm no old domain remains.
Sending only cta_link leaves the body, title, and publication state untouched. Note that it does bump each post's updated_at, so the lastmod values in your sitemap shift to that date for every post you process. We recommend trying it on a few posts first and checking the result before running the full set. See the API docs for the exact request format.
If that's not something you can run yourself, contact us in chat with your blog address.
No Domain? No Problem.
If you lack a custom domain, continue using the default blog domain (e.g., example.inblog.io) by selecting the "I don't own a domain" option during setup. You can upgrade to a custom domain at any time.
How do I add a "Blog" tab to my main website's navigation?
inblog does not control your main website's navigation menu. To add a blog link, update the navigation in the tool used to build your main site (e.g., Webflow, Framer, WordPress, or your CMS).
Use your inblog blog address as the link target:
- Subdomain:
https://blog.example.com - Subdirectory:
https://example.com/blog
Before connecting a custom domain, you can temporarily use the default inblog domain, e.g.,
https://example.inblog.io.
How do I make the blog header logo link back to my main website?
In the inblog dashboard, go to Design tab → Header. There you can set the logo image and the URL visitors are taken to when they click it. Enter your main website URL to redirect visitors to your homepage.
Last updated 2026-09-08